Thursday, October 30, 2014
Nokia 7510 supernova Keypad connections on solution
heres the solution for nokia 7510s keypad problems. This solution shows the complete connection of each keypad keys for easy tracing and troubleshooting keypad failure on the device.
Nokia 1800 and Nokia 1616 Charging problem solution
Nokia 7510s keypad keys connections
And this solution shows as guide on handling the keypad filter IC.

Nokia 1800 and Nokia 1616 Charging problem solution
Nokia 7510s keypad keys connectionsAnd this solution shows as guide on handling the keypad filter IC.
Nokia 7510s keypad IC internal circuit line paths
Hard Reset MyTouch 4G
If your phone MyTouch 4G is locked and you forgot the password or it hangs and become unresponsive or simply just want to reset it to its original factory default settings, you can hard reset My Touch 4G using a combination of device key buttons.
To perform a hard reset using the device key buttons follow these steps:
1. Turn off the device or remove the battery for a few seconds.
2. Insert back the battery.
3. Press and hold the Volume down button.
4. While continuing to hold Volume down button, press and hold the Power button for 5 seconds then release.
5. When you see the Android logo appear, you may then release Volume Down.
6. Use the Volume Up/Down buttons to highlight Factory reset.
7. Press the Power button to select.
The hard reset operation will start . It could take several minutes to finish , after that the MyTouch 4G will reboot.
Read More..
To perform a hard reset using the device key buttons follow these steps:
1. Turn off the device or remove the battery for a few seconds.
2. Insert back the battery.
3. Press and hold the Volume down button.
4. While continuing to hold Volume down button, press and hold the Power button for 5 seconds then release.
5. When you see the Android logo appear, you may then release Volume Down.
6. Use the Volume Up/Down buttons to highlight Factory reset.
7. Press the Power button to select.
The hard reset operation will start . It could take several minutes to finish , after that the MyTouch 4G will reboot.
Nokia 1280 charger not supported solution
Heres a solution for Nokia 1280 For Charger Not Supported problem; This solution shows the location of the BTEMP 47k thermal resistor that controls the charging indication on nokia 1280 handset.
Just see the solution below to locate it where it is being mounted on Nokia 1280 PCB boards components layout.By replacing this said resistor may only possibly fix and repair a nokia 1280 with charger not supported problem issues.

The 47k BTEMP (battery temperature) resistor is mounted or located near the keypad backlight LED, just in the middle part of the PCB board.
Just see the solution below to locate it where it is being mounted on Nokia 1280 PCB boards components layout.By replacing this said resistor may only possibly fix and repair a nokia 1280 with charger not supported problem issues.
Nokia 1280 Charger Not Supported Solution
The 47k BTEMP (battery temperature) resistor is mounted or located near the keypad backlight LED, just in the middle part of the PCB board.
Wednesday, October 29, 2014
Nokia 2710NE Insert Sim Card Solution Insert sim problem repair
Insert Sim card solution for Nokia 2710 navigation edition. This solution may help fix and repair a wet damaged or accidentally dropped nokia 2710 and result displaying "insert sim card" on the LCD screen display.
 Repair tips: Check or Trace the VSIM power supply voltage from the power IC to the VSIM pin connector of the sim card holder or socket. Trace all the remaining line tracks indicated on the solution above those are the SIM Data, SIM Clock and SIM Reset line paths. If all of those line paths are okay, you may then replace the SIM EMI-ESD Filter IC. The SIM Filtering ICs internal solder ball bumps connection is also included on the solution.
Nokia 2710ne Insert Sim card repair solution
Nokia C2 01 Hand Free Problem Solution Jumper Ways
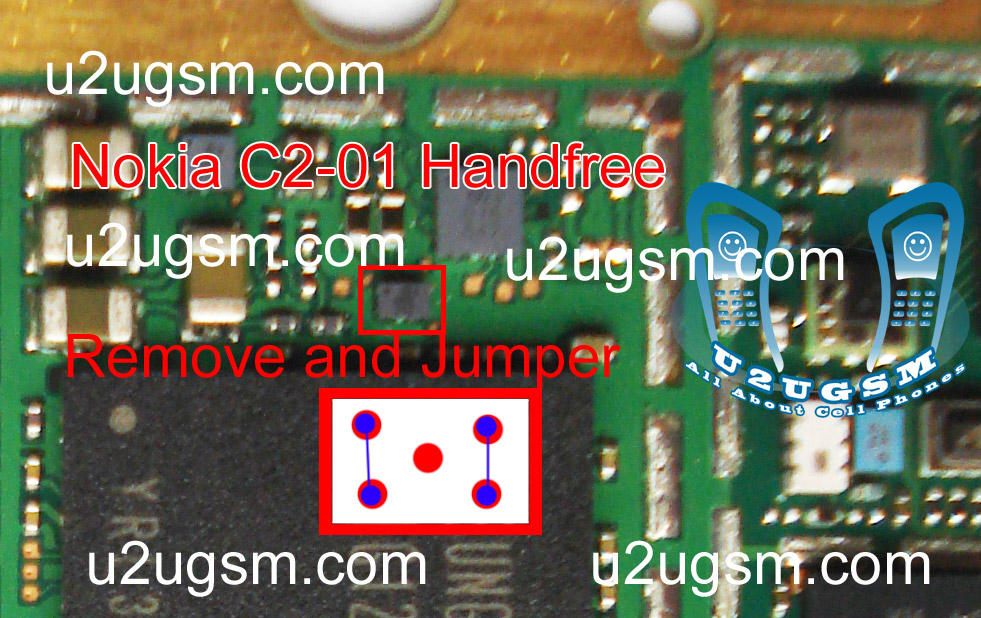 Nokia C2-01 it can be solve with a few steps that I am going to post in this post. If hand free is open you will see a notification of hands fee in Nokia C2-01 while hand free is not plugged in Nokia C2-01 Bluetooth Fm Radio is Not Working Solution see all cellular mobile repairing solution
To solve Nokia C2-01 Hendfree problem remove Ic that is identified with red line.you can apply jumper as shown in above diagram and in above diagram you can find jumper in red line.
Once you apply jumper hand free problem will be solve. And if it cannot be solve with applying jumper you can replace hands free jack.
for more detail and new tips and tricks about cellphone service problem keep visiting this page we will update cellphone service diagrams timely with new cellphone diagrams.some related post are also given bellow you can read them also for more information about cellphone.
Hard Reset for Motorola Droid A855
For those having an issue with their Motorola Droid A855 like hang or slow response or perhaps just want to reformat your phone and start fresh , you can reset it back to factory default setting .
We are going to show you two different techniques of hard reset for Motorola Droid A855. You can try it with the use of the device key or the setting menu .
Using the setting menu:
1. From the home screen, select the applications tab (located at the bottom).
2. Select Settings.
3. Select Privacy.
4. Select Factory data reset.
5. Select Reset phone.
6. Select Erase Everything.
Using the device key:
1. Power OFF your device.
2. Slide to open keyboard.
3. Hold the letter X then press the power ON until you see a graphic of an exclamation point within a triangle.
4. Press and hold the Volume Up key then Camera key until the recovery menu appears.
5. Using the Volume key select Wipe Data Factory Reset
6. Press the center of navigation pad.
7. Using the Volume keys select Delete All User Data.
8. Press the center of navigation pad.
8. Using the Volume keys select Reboot System Now.
Read More..
We are going to show you two different techniques of hard reset for Motorola Droid A855. You can try it with the use of the device key or the setting menu .
Using the setting menu:
1. From the home screen, select the applications tab (located at the bottom).
2. Select Settings.
3. Select Privacy.
4. Select Factory data reset.
5. Select Reset phone.
6. Select Erase Everything.
Using the device key:
1. Power OFF your device.
2. Slide to open keyboard.
3. Hold the letter X then press the power ON until you see a graphic of an exclamation point within a triangle.
4. Press and hold the Volume Up key then Camera key until the recovery menu appears.
5. Using the Volume key select Wipe Data Factory Reset
6. Press the center of navigation pad.
7. Using the Volume keys select Delete All User Data.
8. Press the center of navigation pad.
8. Using the Volume keys select Reboot System Now.
How to Hard Reset G1 T Mobile
Ever wanted to learn how to hard reset G1 T-Mobile? Performing a factory reset is a quite simple procedure on the G1 which is really great for those returning units , reselling units , and/or simply want a new start .
Resetting the G1 google phone deletes every data , which include installed applications , and resets the device back into its original state when you started up the device for the very first time . Make sure you back-up necessary data you have on the phone before you decide to do a factory reset .
Heres how it works:
1. Turn Off the device.
Note: If the device is not responsive and does not turn off, remove the battery and re-insert it.
2. Press and hold the Home button and the Power button together for 20 seconds or until you see a triangle with an exclamation point.
3. Slide to open the keyboard then press Alt+L
4. Press Alt+W for wipe data/factory reset.
5. Press the Home+Back key.
1. Press Home>Menu> and then touch Settings.
2. Scroll down the screen then touch SD Card and Phone Storage.
3. Navigate to the Internal Phone Storage section then touch Factory Data Reset.
4. On the Factory Data Reset section, touch Reset Phone then touch Erase Everything.
Read More..
Resetting the G1 google phone deletes every data , which include installed applications , and resets the device back into its original state when you started up the device for the very first time . Make sure you back-up necessary data you have on the phone before you decide to do a factory reset .
Heres how it works:
1. Turn Off the device.
Note: If the device is not responsive and does not turn off, remove the battery and re-insert it.
2. Press and hold the Home button and the Power button together for 20 seconds or until you see a triangle with an exclamation point.
3. Slide to open the keyboard then press Alt+L
4. Press Alt+W for wipe data/factory reset.
5. Press the Home+Back key.
1. Press Home>Menu> and then touch Settings.
2. Scroll down the screen then touch SD Card and Phone Storage.
3. Navigate to the Internal Phone Storage section then touch Factory Data Reset.
4. On the Factory Data Reset section, touch Reset Phone then touch Erase Everything.
Nokia X6 Digital Mic mouthpiece microphone problem Solution
Heres the solution that might possibly help solve Nokia X6 mouthpiece microphone failure, a problem that no audio sounds can be heard from the other receiving device during a call is created.
 The red lines indicated in the solution above is the microphones supply voltage if this voltage is cut or not present the mic will not tend to work. There are also resistors that where the digital audio signal is flow across to this components that has a resistance value of 100ohms each, check and replace it first before attempting to replace the Digital Microphone Module.
Read More..
Nokia X6 Microphone sound failure solution
Tuesday, October 28, 2014
Nokia 5630 Earpiece and Integrated Hands Free Speaker Sounds Failure Solution
These are the solution for 5630 xpressmusic audio sounds output failures such no ringtones can be heard, no earpiece and loud speaker sounds can be heard.
This covers both for earpiece speakers and integrated hands free loud speaker failures.
For beginners: Ensure that the speaker is perfectly check and test and found working okay before using this guides below.
This first solution is for earpiece speaker sounds output failure, you check and replace thos components highlighted on the picture after ensuring that the speaker is working fine but still no sounds can be heard. This components are composed of filter coil and ESD filter chip.
Nokia 2710NE charger not supported solution

The second below solution is for integrated hands free speaker failure; If the below components is damaged these may result to no ringtone and mp3 music can be heard when playing.
 Each components were composed of SMD (surface mount) filter coils. You may check the continuity of this coils and replace if found damaged. The line tracks connection is indicated on colored lines. You may also trace this line paths for further troubleshooting.
This covers both for earpiece speakers and integrated hands free loud speaker failures.
For beginners: Ensure that the speaker is perfectly check and test and found working okay before using this guides below.
This first solution is for earpiece speaker sounds output failure, you check and replace thos components highlighted on the picture after ensuring that the speaker is working fine but still no sounds can be heard. This components are composed of filter coil and ESD filter chip.
Nokia 2710NE charger not supported solution
The second below solution is for integrated hands free speaker failure; If the below components is damaged these may result to no ringtone and mp3 music can be heard when playing.
Nokia 3500c Hands Free Ringer Speaker No Audio Sound Solution
Heres the solution for NOkia 3500 classic No Hand Free Speaker sound can be heard repair solution. If you ever tried checking and ensuring that loud speaker seem working but still there is no audio sound can be heard on the device when hands free is activated. This solution shows particular PCB board components that may possibly faulty or damaged and cause the Nokia 3500 not have an audio sound output over the speaker.
Nokia 3500c Hands Free & Ringer Speaker No Sound Solution
Ensure the speaker is working, replace if the sound is distorted.
Check the connected filter coils on the circuit, replace if found damaged.
Trace the line paths, mend a jumper wire if found open circuit.
If the line paths and the filter coils are okay, rework the audio IC (RETU). Replace if does not solved the problem.
Read More..
Nokia 3500c Hands Free & Ringer Speaker No Sound Solution
Ensure the speaker is working, replace if the sound is distorted.
Check the connected filter coils on the circuit, replace if found damaged.
Trace the line paths, mend a jumper wire if found open circuit.
If the line paths and the filter coils are okay, rework the audio IC (RETU). Replace if does not solved the problem.
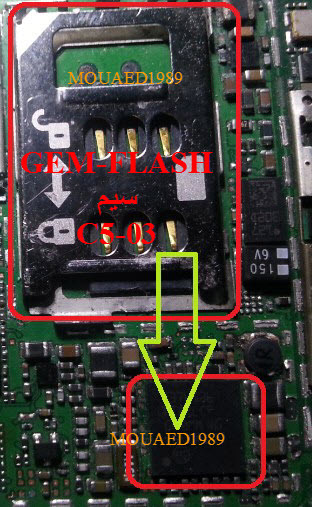
Nokia C5 06 Insert Sim problem solution
Nokia C5-06 insert sim problem, Sim not valid in Nokia C5-06, Sim card problem. All these problems can be solve with this diagram that is given bellow in this post to solve Nokia C5-06 insert sim problem.
nokia Asha 202 keypad problem solution with IC

In above diagram red color line is identifying an IC that is used in sim function.After dis assembly of Nokia C5-06 check this IC and its near by area.
If you found some rust carbon or water damages then it can also be cause of Nokia C5-06 insert sim problem to solve and fix insert sim problem in Nokia C5-06 clean all the rust and carbon with electronics cleaner and apply hot air to make it dry.
Re sold or Re flow this Ic and if resolding can not solve insert sim problem in Nokia C5-06 then replace this IC.
for more detail and new tips and tricks about cellphone service problem keep visiting this page we will update cellphone service diagrams timely with new cellphone diagrams.some related post are also given bellow you can read them also for more information about cellphone.
Read More..
nokia Asha 202 keypad problem solution with IC
In above diagram red color line is identifying an IC that is used in sim function.After dis assembly of Nokia C5-06 check this IC and its near by area.
If you found some rust carbon or water damages then it can also be cause of Nokia C5-06 insert sim problem to solve and fix insert sim problem in Nokia C5-06 clean all the rust and carbon with electronics cleaner and apply hot air to make it dry.
Re sold or Re flow this Ic and if resolding can not solve insert sim problem in Nokia C5-06 then replace this IC.
for more detail and new tips and tricks about cellphone service problem keep visiting this page we will update cellphone service diagrams timely with new cellphone diagrams.some related post are also given bellow you can read them also for more information about cellphone.
Monday, October 27, 2014
Nokia 2710 Navigation Edition Solution for Charging Problem issues on
Heres the solution to repair Nokia 2710ne Charging problem issues when being damaged or occurred like, Not charging, unable to charge up the cell phone battery or it does not show the charging indication whatsoever.
This repair solution shows the location of each particular components that possibly might damaged if the said charging problem occurred.
 The charging circuit of Nokia 2710ne is originally same us other nokai mobile phone devices. it is located at the bottom side of the PCB board isolated from other components.
Check up and repair tips:
1. check, clean or replace the charging pin connector and also see to it that the charging pin contact pads is al free from dirt and corrosion.
2. check the continuity of the fuse by using a multimeter, if found busted replacing it is highly advice.
check the diode if it is shorted, a shorted diode may cause the fuse to blown again, replace it also and dont just remove it and leave it hang in there. In this method you can save the phone in the future when an excessive charger voltage may cause the trouble again.
3. All other components needs also to check, replace as necessary if the above solution does not solve the problem. just follow the instruction on the repair guide picture above according to it marked numbers.
This repair solution shows the location of each particular components that possibly might damaged if the said charging problem occurred.
Nokia 2710 NE charging circuit components location layout
Check up and repair tips:
1. check, clean or replace the charging pin connector and also see to it that the charging pin contact pads is al free from dirt and corrosion.
2. check the continuity of the fuse by using a multimeter, if found busted replacing it is highly advice.
check the diode if it is shorted, a shorted diode may cause the fuse to blown again, replace it also and dont just remove it and leave it hang in there. In this method you can save the phone in the future when an excessive charger voltage may cause the trouble again.
3. All other components needs also to check, replace as necessary if the above solution does not solve the problem. just follow the instruction on the repair guide picture above according to it marked numbers.
Sunday, October 26, 2014
Nokia 1280 no network signal drops solution
Heres the solution for hardware related Nokia 1280 with a No network signal problem.
The solution below shows the RF circuit of Nokia 1280 that holds the device for intercepting Network Data signal transmission. If this said circuit get damaged or become faulty due to wet or water damaged and accidentally dropped, this will result to network signal lost.
Refer to the solution to locate the RF circuit components where it is being mounted on Nokia 1280 PCB board.

The highlighted layout of components showed on the solution above indicates some hints where you will be able to have a check and fix the Nokia 1280 No network coverage problem.
Before attempting to rework or replace the RF Amplifier Chip, ensure that the supply voltage and RF clock oscillator is working okay.
The solution below shows the RF circuit of Nokia 1280 that holds the device for intercepting Network Data signal transmission. If this said circuit get damaged or become faulty due to wet or water damaged and accidentally dropped, this will result to network signal lost.
Refer to the solution to locate the RF circuit components where it is being mounted on Nokia 1280 PCB board.
Nokia 1280 No Network Signal Problem Solution
The highlighted layout of components showed on the solution above indicates some hints where you will be able to have a check and fix the Nokia 1280 No network coverage problem.
Before attempting to rework or replace the RF Amplifier Chip, ensure that the supply voltage and RF clock oscillator is working okay.
Update the Samsung Galaxy ACE with the Official DDKQ8 Gingerbread 2 3 6 Firmware

Note:- This post is only for the educational purpose. So if, anything happens to your device we are not responsible for that.Before to begin apply the updating process we recommend to back up up all your personal data stored on the device, even if the developer does specify that, always is good to make a backup-up for all your data. Bellow we will show you some methods to help you save all important data stored on your phone:
- Save your personal Text messages by installing SMS Backup & Restore.
- Sync your Phone Contacts via your Gmail/Google account or you can export the contacts to your micro SD card.
- Save your Call Log by installing the Call Log Backup and Restore application.
- Charge your phone to a minimum of 60%, we always recommends charging your device to full that ensure your device will not power of during the update installation process.
- Save your internet setup and MMS settings, you can back-up all these by settings from this patch: “Applications > Settings > Wireless and Network > Mobile Networks > Access Point Names”
- Enable the USB debugging on your phone following this patch: Settings > Applications > Development > USB debugging. The USB Debugging option should be ticked.
- Go to disable your antivirus protection and other security services (firewall), because these services can interfere with the installing update process.
With this in our attention bellow is the procedure for :
How to Update the Samsung Galaxy ACE with the Official DDKQ8 Gingerbread 2.3.6 Firmware:
- Download DDKQ8 Gingerbread 2.3.6 Firmware Package on your PC after that extract it on your desktop to have an easy access to it, verify if you have four files in the archive, please make sure you have all four file before moving on forward.
- Next step is to start the Odin program from the extracted files.
- Now power off your Samsung Galaxy Ace phone.
- Start your device into Download mode, for do this press the Menu Key and then press Power On button simultaneously, after the device has been shut down completely. Verify you are on the Download Mode before moving to the next step.
- Connect your phone in Download Mode status with the original USB cable to the computer already running the Odin app and now wait for Odin recognize the device, when Odin has recognized your phone, just look the color of the ID : COM window, if the color is yellow you are ready to proceed. Now please be careful, because the following step has a bit hard complexity.
- Press the One Package option from the top left side of Odin app.
- Then click the OPS button in the right part of Odin and select the Cooper_v1.0.ops file.
- Click the One Package button in the bottom right and select S5830DDKQ8_S5830ODDKQ7_S5830DDKQ8_HOME.tar.md5 file.

- Now Press the Start button in Odin app and now you should wait a couple of minutes for the Odin program to do its process.
- After the Odin has finished its job, your Samsung Galaxy Ace should automatically restart. This reboot and boot may normal take a little long time.
Saturday, October 25, 2014
Nokia 2690 keypad IC jumper ways and line tracks full solution
Heres the full and complete solution for Nokia 2690 Keypad line tracks and keypad filter IC jumper ways including the power on-off key connection. This solution below may possibly help fix and repair a certain keypad malfunction that stop responding on a damaged Nokia 2690 cell phones.Nokia 2710NE Keypad repair solution - keypad IC, flex and pin connector line tracks
Ensure that the keypad membrane is perfectly clean before trying to trace each corresponding keypad keys that is not responding. Majority of each group of connection has three keys are connected together, therefore if only one or two keys are not working, the problem may lies on open line tracks. If more than three or all of keys are not working the problem may lies on a damaged EMI-ESD filter chip.
Read More..
Nokia 2690 keypad Line Tracks and filter IC jumper ways solution with power ON/OFF key

Ensure that the keypad membrane is perfectly clean before trying to trace each corresponding keypad keys that is not responding. Majority of each group of connection has three keys are connected together, therefore if only one or two keys are not working, the problem may lies on open line tracks. If more than three or all of keys are not working the problem may lies on a damaged EMI-ESD filter chip.
Thursday, October 23, 2014
Blackberry 9500 Cellular phone Mic Repair Solution
blackberry 9500 cellular phone mic repair solution,blackberry 9500 cellular phone mic not working repair solution,blackberry 9500 cellular phone mic jumper solution,blackberry 9500 cellular phone mic line not working tips and tricks, blackberry 9500 cellular phone mic jumper ways 100% tested solution here ,if u have blackberry phone 9500 mic not working i have this mic 100% tested solution try my way i think 100% working this solution for u 1st try mic change 2nd check to boot line not done check my diagram i hope now solved your phone problem see my diagram
Blackberry 9000 cellular mobile boot it reboot restart red blink solution

follow this diagram and see yellow part if u have blackberry 9500 cellular phone 1st soldaring all parts i hope solved not solve problem not solve change all parts 1 by 1 and tested working your phone again working ,
Blackberry 8530 keypad not working Solution
Blackberry 8530 keypad Solution,Blackberry 8530 keypad not working Solution,Blackberry 8530 keypad line Solution,Blackberry 8530 keypad with out ic problem solve Solution Blackberry 8530 keypad jumper Solution,Blackberry 8530 keypad line missing only jumper solution blackberry 8530 keypad line missing guide Solution 100% tested this solution try this blackberry keypad ic ok but not working any key solution blackberry 8530 step step try my solution i hope 100% working your phone this solution many phone tested
try it
blackberry 8520 vusd jumper Solution

solved your phone plz comments plz
Blackberry 9550 Cellular Phone Mmc Repair Solution
blackberry 9550 cellular phone mmc repair solution,blackberry 9550 cellular phone mmc memory not working repair solution,blackberry 9550 cellular phone mmc memory not format repair solution,blackberry 9550 cellular phone mmc repair guide solution here ,blackberry 9550 cellular phone mmc tips and tricks here,blackberry 9550 cellular phone mmc memory ic jumper repair solution guide,if u have blackberry 9550 memory ic not working means not accept memory this phone i have this problem 100% tested solution see this solution solve your blackberry mic problem 1st try to bess for memory and 2nd try my solution off diagram see this blackberry 9300 Cellular Phone Mmc Repair Solution
see diagram

see this 2 ic 1st try reheat i hope solved your problem not solve try to use change this ic 100% working now many time tested me this solution and dont forget visit my blog .
Wednesday, October 22, 2014
Blackberry 7290 Light Solution Jumper Solution 100 tested solution
blackberry 7290 light solution ,blackberry 7290 no light solution is here,blackberry 7290 light jumper way,blackberry 7290 without ic light solution only jumper way,7290 light solution tested ,blackberry ic damage but light working solution , blackberry 7290 no light only jumper solution 7290 blackberry light not working solution ,100% tested blackberry 7290 light solution without ic only jumper way see this way i hope solved your blackberry 7290 light solution,
blackberry 8100 battery cross icon solution 100% tested jumper solution
blackberry 8100 battery cross icon solution 100% tested jumper solution

blackberry 7290 no light solution if u need 100% tested solution try this solution and jumper this line i hope solve your blackberry 7290 light solution .
Saturday, October 18, 2014
Nokia Asha 300 Keypad Not Working Problem Solution Jumpers
If any, all or a few keys not working in nokia asha 300 then this post will help you to solve all keypad not working problems easily and in a quick way. Simply look at diagram bellow and check all the track and links as shown in it.Nokia 2320 Classic Local Test Mode Problem Solution see All cellular mobile repair solution

Once you check with meter if any of them is broken make these jumpers and your problem will solve easily. All same color keys outer and inner are to define same link ways. If a single key is not working we can apply jumper form other key that have same color for outer or inner.
Some key are going to resistance and capacitors in diagram so we have to apply jumpers on those places and parts. In diagram above a few small diagrams have red border and these are zoom images of the board so that you can see parts vary clearly.
So zoom diagram are only to show close up of board. The diagram above also contain on off button ways in it.
for more detail and new tips and tricks about cellphone service problem keep visiting this page we will update cellphone service diagrams timely with new cellphone diagrams.some related post are also given bellow you can read them also for more information about cellphone.
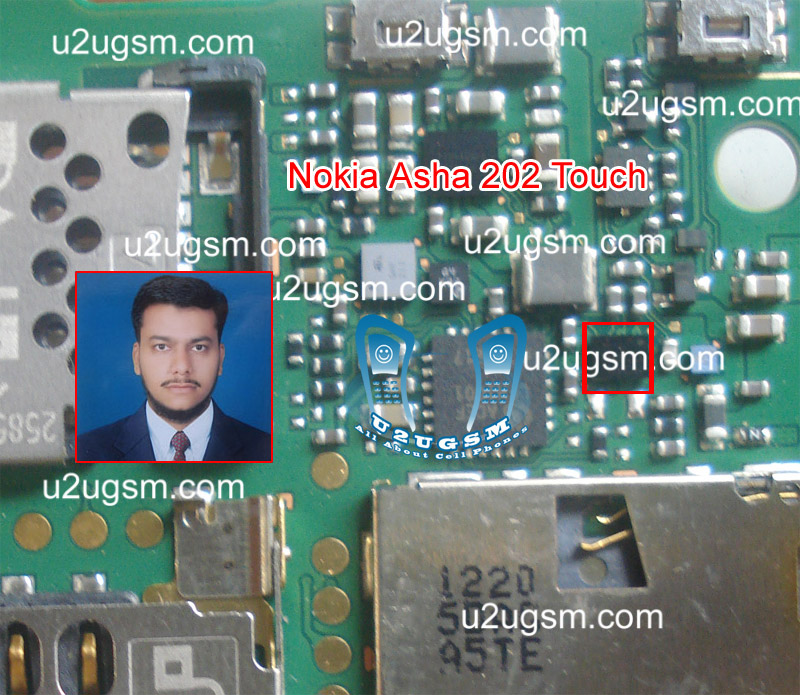
Nokia Asha 202 Touch Screen Problem Solution IC
nokia asha 202 touch Lcd, touch pad is not working it can be due to damages, Water damages, Burning parts.This post will teach you about IC that is used in nokia asha 202 touch Lcd function workings.nokia C2-00 Lcd Display Light Jumper Solutions

You can use calibration settings for touch Lcd solution in nokia asha 202. After dis assembly replace touch Lcd and if replacement of nokia asha 202 touchLcd can not solve touch problem you can check this IC.
Touch Lcd ic is identified in this diagram with red lines Re sold this IC and Re flow the touchLcd IC. You may have to replace this Ic if Resolding can not solve Touch Lcd in Nokia Asha 202.
for more detail and new tips and tricks about cellphone service problem keep visiting this page we will update cellphone service diagrams timely with new cellphone diagrams.some related post are also given bellow you can read them also for more information about cellphone
Read More..
You can use calibration settings for touch Lcd solution in nokia asha 202. After dis assembly replace touch Lcd and if replacement of nokia asha 202 touchLcd can not solve touch problem you can check this IC.
Touch Lcd ic is identified in this diagram with red lines Re sold this IC and Re flow the touchLcd IC. You may have to replace this Ic if Resolding can not solve Touch Lcd in Nokia Asha 202.
for more detail and new tips and tricks about cellphone service problem keep visiting this page we will update cellphone service diagrams timely with new cellphone diagrams.some related post are also given bellow you can read them also for more information about cellphone
Friday, October 17, 2014

Nokia Asha 202 Lcd display problem solution with jumpers
Nokia asha 202 display problem, nokia asha 202 lcd solution, nokia white display problem, nokia blank lcd solution. All these problems can be solve with tips and tricks that are given in this post bellow. A lcd display repairing diagram is also attached with this post.Nokia C5-03 Volume Keypad Lock keys not working Solution

After dis assembly of nokia asha 202 replace LCD and check the display. If replacement of LCD can not solve display problem in nokia asha 202 you can check water damages in the mother board.
If mother board is wet or having water damages and carbon on it. Clean the nokia asha 202 mother board with electronics cleaner and apply hot air to make it dry. Do not apply much heat it can be dangerous for you skin or can damage the mother board of nokia asha 202.
Lcd display jumpers are given in different colors in above display repairing diagram of nokia asha 202. Check these lcd display repairing tracks and if any of them is missing apply these jummpers to solve display problem in nokia asha 202.
for more detail and new tips and tricks about cellphone service problem keep visiting this page we will update cellphone service diagrams timely with new cellphone diagrams.some related post are also given bellow you can read them also for more information about cellphone.
Nokia e52 100 tested fake charging solution
when you plug in charge to charging pin of nokia e52 and it shows charging indication but do not charge the battery. It can be the fault of charging IC that is given in repairing diagram of nokia e52 for not charging or fake charging.Nokia C5-03 Display Problem Lcd Solution Jumpers

dis assemble the mobile phone and then find out if there is rust water damages or burn and carbon on the smart phone mobile.Clean the mother board with electronics cleaner and apply some heat with hot air to make it dry.
Re sold the Ic and Re flow it. If resolding can not solve not charging or fake charging problem in nokia e52 replace this IC that is used for Charging function of nokia e52.
for more detail and new tips and tricks about cellphone service problem keep visiting this page we will update cellphone service diagrams timely with new cellphone diagrams.some related post are also given bellow you can read them also for more information about cellphone.
Wednesday, October 15, 2014
How to Share Contacts Using NFC on Sony Xperia Z2 Tablet
 NFC feature is a must-have for any smartphones these days. Near-field communication or NFC works similarly like bluetooth. By touching your NFC-enabled phones against each other, you can then share contacts, music and photos. Well, heres how you can easily share contacts on Sony Xperia Z2 Tablet uisng NFC feature.
nokia 100 charging solution
nokia 100 charging solution.nokia 100 charging problem solution
nokia 100 charging
nokia 100 charging jumper solution
nokia x2-00 not charging solution
nokia 100 not charging jumper
samsung GT-E 2130
nokia 100 charging way
nokia 100 charger not supported
nokia 100 charging ic
nokia 100 charging track
![nokia]()
nokia 100 charging fault
images repair Nokia Not Charging 100
Nokia 100 charging problem
NOKIA 100CHARGING PROBLEM SOLUTION
nokia100 charging prob
repair nokia 100 charger
n 100 charging problem solution
nokia 100 blue print
www nokia 100 charging problem
nokia 101 not charging problem solution video
nokia 100 charging
nokia 100 charging jumper solution
nokia x2-00 not charging solution
nokia 100 not charging jumper
samsung GT-E 2130
nokia 100 charging way
nokia 100 charger not supported
nokia 100 charging ic
nokia 100 charging track
nokia 100 charging fault
images repair Nokia Not Charging 100
Nokia 100 charging problem
NOKIA 100CHARGING PROBLEM SOLUTION
nokia100 charging prob
repair nokia 100 charger
n 100 charging problem solution
nokia 100 blue print
www nokia 100 charging problem
nokia 101 not charging problem solution video
Tuesday, October 14, 2014
nokia 111 ringer solution
This post is about nokia 111 ringer solution solving. If your nokia 111 ringer buzzer not working as you see in the diagram below. This solution works on all Nokia 111 RM-827, Nokia 1110 RM-810, Nokia 111 and Nokia 1111 RM-811 RM-871st

First make sure that nokia 111′s ringer is not broke, you can test it with electronic meter or just replace it with a new one. If your ringtone is in good voice I have post Nokia 111 and Nokia 111 Ringer Ways jumper points in the above figure. Make the jumper as shown in this diagram to solve your problem.
First make sure that nokia 111′s ringer is not broke, you can test it with electronic meter or just replace it with a new one. If your ringtone is in good voice I have post Nokia 111 and Nokia 111 Ringer Ways jumper points in the above figure. Make the jumper as shown in this diagram to solve your problem.
Monday, October 13, 2014
nokia 111 lcd light jumper solution
If nokia 111 lcd light is not lighting (not working) you can solve this problem by following a few steps that are given bellow in diagram.In bellow diagram you can see some different color lines. All these lines are given to show different lcd track that are used in display function of nokia 111.

Print number 10 and 11 is used for light in nokia 111. so if your lcd display is proper but only light is not working you should have focus on these two lines and check there path and parts.If you find any missins part or damage part then apply jumper there.
Print number 10 and 11 is used for light in nokia 111. so if your lcd display is proper but only light is not working you should have focus on these two lines and check there path and parts.If you find any missins part or damage part then apply jumper there.
Thursday, October 2, 2014
Samsung Galaxy S i9000 White Screen fix problem

Wednesday, October 1, 2014
Troubleshooting Kyocera Hydro Xtrm And User Guide
KYOCERA Hydro XTRM by US Cellular Operating Instruction and if you need information about operating intruction smarphone motorola here
How to Add App Shortcuts or Widgets to your Home Screen?
1. Touch Apps on the favorites tray.
2. Slide the APPS and WIDGETS Lcds to find the item you want to add to the home Lcd.
3. Touch and hold the app icon or widget and move your finger to find the place to add it to. The blue frames which appear on the Lcd indicate where you might place the item.
4. Release your finger.
How to Set Up Portable Wi-Fi Hotspot?
1. Touch Home -> Apps -> Settings -> More… -> Tethering & portable hotspot -> Portable Wi-Fi hotspot.
2. Read a message and touch Accept to activate the service.
3. Enable Wi-Fi (wireless) functionality on your target device (laptop, media device, etc).
4. Scan for Wi-Fi networks from the device and select your phone hotspot from the network list.
How to Share Videos on YouTube?
1. Touch Home -> Apps -> Gallery.
2. Touch the album that contains the videos you want to share.
3. Press the video until you see a blue frame around it. Touch multiple videos to select them.
4. Touch Share Icon -> YouTube.
5. Enter the prompted information, such as description and tags, and select a privacy option.
6. Touch Upload Icon.
To know more about complete quick operating guide of KYOCERA Hydro XTRM smartphone, you can download this US Cellular KYOCERA Hydro XTRM user guide manual below.
to know about troubleshooting smartphone LG Optimus l9 here
Table contents of KYOCERA Hydro XTRM user guide manual
- Phone Basics
- Text Entry
- Phone Calls
- People
- Accounts and Messaging
- Applications and Entertainment
- Web and Data
- Camera and Video
- Tools and Calendar
- Settings
- Notes
- Copyright Information
- Index
This KYOCERA Hydro XTRM user guide manual is available for FREE at US Cellular official website,to download smartphone LG Optimus F7 user guide manual here
Download KYOCERA Hydro XTRM user guide manual.PDF (3.36 MB)
Samsung i9003 Due To Heat fix problem

Subscribe to:
Posts (Atom)